User Guide: Rooftop design, proposal tips from solar software providers
Solar design and sales platforms are more feature-rich than ever, but process missteps are still common and costly. Here are some handy reminders and solid strategies to ensure you close deals and design
the best possible system for each site.
Three tips for overhead analysis
By Desmond Pressey, Folsom Labs
When it comes to PV system design and shade analysis, residential solar installers are best equipped when they can use multiple resources to check the accuracy of their solar proposal.
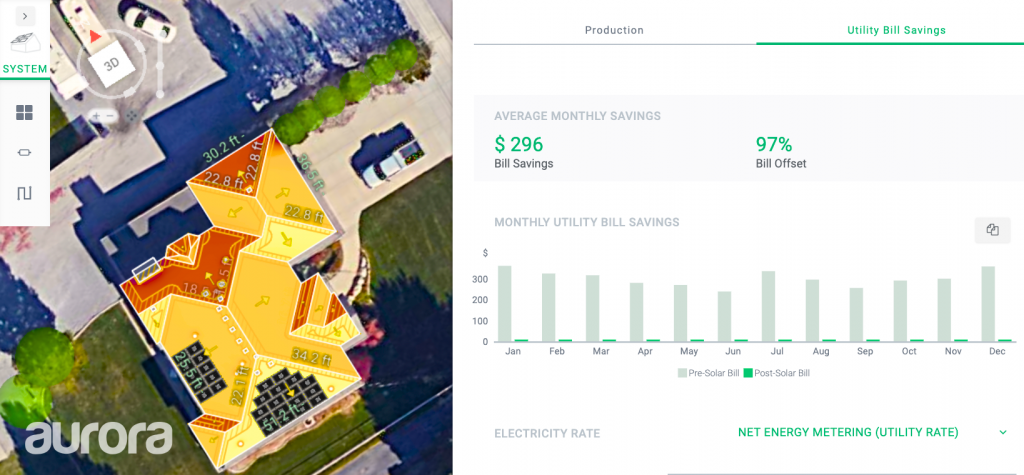
First, solar installers should utilize multiple map services. First time users of solar design software tend to jump in and begin designing before checking for the best image quality available. Make sure to compare the Google, Bing, or third-party vendors such as Pictometry or Nearmap for your design before starting (comparison example on next page). If you have a drone image or a site plan, you can utilize that as an overlay for sites where the shading or other objects have changed drastically, or when you are designing for a new development.


Second, installers should work with realistic expectations for tree and shade modeling. It’s common for many solar designers to overestimate shade losses. As you can see in the image up top, while the trees are tall, they are relatively far from the rooftop, and therefore do not cause significant shade losses. Because most of the energy production happens in the summer and at mid-day, when the sun is directly overhead, and the shadows are short, designers should only disqualify homes that have tall structures or trees that are very close to the house or directly overhead.
That being said, pro-solar designers will still incorporate any shade object in their design that the homeowner may consider, calming any concerns of not getting production out of their investment. Expert designers will factor in some tree growth and communicate that with the homeowner.

Third, be aware of the weather file you are using. Different weather files in the same location can vary by as much as 5 to 10 percent, which can make or break a solar proposal. Many pro-level designers will run two or more simulations with different weather files, and possibly take an average of the simulation results. In particular, there are two weather file types (satellite-based, and ground-based), and some installers might develop a specific preference for one type or the other. Be sure to use a software program that can support multiple weather types, and multiple side-by-side simulations.
Ultimately, the best residential solar designers are able to quickly generate preliminary designs, but also know when (and how) to go deeper and incorporate multiple scenarios.
… and a three-step sales process
What often separates the pro-level salesmen from the rest is the ability to identify where the customer is in their buying cycle. Once sales teams become comfortable with the technical aspects of solar, they should spend ample time studying their customer’s buyer journey. Once you’ve defined stages for your customers, set up sales processes, content, scripts, etc., to guide your customers through the stages to closing the sale. We can summarize the stages into three categories: awareness stage, consideration stage, and decision stage.
Acquiring a customer in the awareness stage is a major opportunity for solar salespeople to control the customer’s journey — but this is also where many salespeople waste a lot of time. Too often, solar is taught to be a one-sit-close sales process, and steps in the buyer’s journey are skipped. Closing on the first sit is still possible and can be done by focusing on the most valuable information when presenting to an awareness stage customer. At this point, sales staff should stick to the benefits (savings, tax benefits, home value, environment, etc.) and make sure that they truly understand why the customer is considering going solar before moving to the consideration stage.
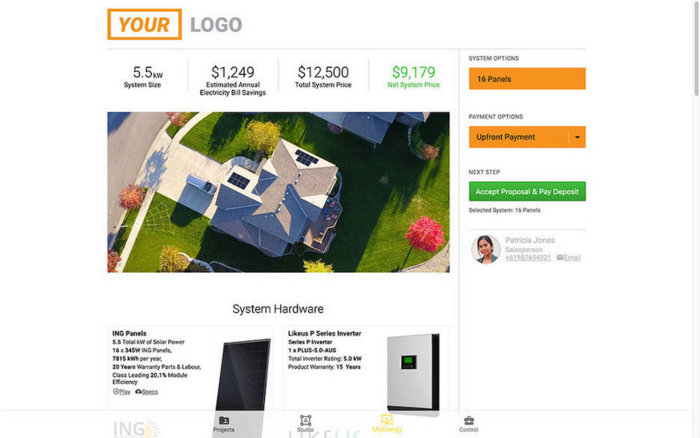
Solar customers in the consideration stage can, at times, be the hardest to read. They can easily be confused for a customer who’s in the decision stage, but in reality, they are just becoming aware of all that going solar has to offer. If salespeople acquire a customer in this stage, they should make sure to double back to understand their customer’s motivating factors for going solar. Once that’s established, this is where sales should differentiate themselves, their products, and their services with well-crafted content and scripts. This is difficult to do, but pro-level solar salespeople are prepared to answer questions about pricing, financing and other decision-leaning questions in this stage with high-level answers. They can utilize a preliminary or “estimate” proposal that can provide the homeowner expectations on price while still leaving room for continuing the sales journey.
The decision stage is where pro-level salespeople close the deal with a well-crafted proposal, readily available financing options, and a simplified process to get a signed contract. The best solar salespeople can win a deal by not rushing a particular financing term, but instead, showing many paths for purchasing the solar system, providing major value to the homeowner that they may not have expected.
Compare, contrast in C&I
By Lili Francklyn, SunDAT

One of your best bets in PV design is software that can lead you through the important steps of analyzing your site and creating various system options to compare, weighing the pros and cons of each. You might want to measure tradeoffs such as system size, cost, electrical layout and other factors. You will also want to see which systems produce more energy output and do an economic analysis of the results.
Given the wide variety of projects that many developers encounter, you will probably want to identify a versatile PV design software tool that can tackle anything from a residential to commercial rooftop installation, a canopy at a car dealership or even a large ground-mounted system that uses trackers and bifacial PV modules. Here are a few key characteristics of the best design tools, mapped to the steps you will probably want to take in your projects.
1. Site analysis: Make sure that you can import geospatial information from a variety of file types to identify topographical challenges and obstructions, especially with ground-mounted systems. One of your goals is sure to be optimization of land use or rooftop space.
2. Automation in design: You’ll want a tool that can take some basic parameters — ideally a range within these parameters — and use that information to come up with a number of system designs within those ranges. You can then compare those designs and choose the one that is best for your needs. Those parameters might include module and inverter selections, structure (tracker or fixed tilt), DC/AC inverter ratio, ground coverage ratio (GCR) for ground-mounted systems and azimuth. Some programs can automate specific features such as roadways and layouts of ground-mounted systems, which saves time in the design process. Finally, certain programs can incorporate shading analysis in the design process.
3. Energy modeling: You need the capability to analyze different system configurations and, with energy production estimates, and understand how to maximize earnings. Weather and insolation databases are prerequisites of any energy modeling and allow you to localize your results. Look for tools that allow the user to tweak the energy model assumptions in detail, such as the ability to modify soiling loss, temperature coefficients, bifacial module characteristics and others.
4. File export: A robust PV design software program will allow you to export a variety of file types (such as 8,760 simulations of energy production and design drawings compatible with other design software) so you can do more detailed engineering and financial analyses.
Design ‘efficiently’
By Sunny Wang, Aurora Solar
Design your customer’s solar PV system as efficiently as possible. You’ve probably heard this advice many times, but what does “efficiently” mean? It means strategically placing each PV panel on areas of the roof that get the most amount of sunlight throughout the day with the least amount of panels needed to meet your customer’s needs. If you design the layout of the PV panels efficiently, you’ll be able to minimize roof penetrations and hardware needed (panels, stringing, racking, inverters, etc.), thus reducing the overall cost of the solar PV system.
The easiest, fastest and most accurate way to determine exactly where to place each panel and how many to use is by using a software that provides key solar values—monthly irradiance, solar access, tilt and orientation factor (TOF), and total solar resource fraction (TSRF)—and can dynamically calculate energy production and utility bill savings as you move, add or remove panels on the roof.
Up front expectations. A common misconception homeowners have is that they will be able to reduce their electricity bill to $0 by installing solar. It’s best to set your customer’s expectations early in the sales process about what percentage of their electricity needs will be covered by their solar PV system and how much money they can expect to save. The surest way to do this is by visually showing your customer how much sunlight their roof gets and how much energy their PV system will produce. As a reference point, you can also share how much your customers typically save from going solar.
Avoiding overs and unders
By Tyler Clarke, OpenSolar
Over promising and under delivering leads to loss of trust, loss of sales and creates customer service issues, so be familiar with the key inputs that performance calculators use and how they affect solar production. These key inputs are PV system performance, slope, azimuth, sun access, irradiance, weather data, POA (incident) irradiance, effective POA irradiance, model DC output, array DC output, system AC output. Being able to accurately calculate production will only help you and your team design systems for your customer to perform more optimally.
The hardware you use to design systems can have large or subtle differences in the system outputs. You want to make sure that you know how these will affect performance and that your design software is able to properly model and reflect these differences, enabling you to explain the benefits of the hardware you have selected to the customer, differentiating yourself from your competition.


Comments are closed here.