10 Tips for Installing Flashed Solar Roof Mounts
1. Locating rafters
Rafter-finding techniques include attic rafter mapping, rubber mallet roof tapping, drilling two to three holes through the sheathing to locate the edge of the rafter or using sophisticated stud finders like the Bosch D-tect 150.
2. Centering attachment point
Take care to center your lag bolt in the middle-third of the rafter. This ensures the fastener has the structural capacities listed by the American Wood Council charts.

Failure to remove nails is the most frequent mistake when installing flashing. Removing nails allows the flashing to extend up under the third course of shingles for code-compliant, reliable waterproofing.
3. Piloting holes
Drilling pilot holes is critically important when using 5/16- or 3/8-in. lag bolts in a 2x rafter. This is true even with the newer generation of self-drilling fasteners (like those from GRK). While these specialty fasteners can be installed in wider lumber without pilot holes, failure to drill pilot holes in the outer chord of 2×4 or 2×6 rafters will likely result in split rafters.
4. Remove shingle nails
Always remove the nails on composite shingles to allow the upper edge of flashing to be 1/2-in. above the butt edge of the third course shingles. Failure to remove nails will prevent the flashing from being positioned up under the butt edge of the third course of shingles and thus become a leak risk, especially when the flashing is positioned under a butt joint between two adjacent sections of shingles.
5. Acceptable working temperature
Shingle temperatures should be between 45° and 85° F to avoid damaging the shingles. When installing on asphalt shingles above 85° F, care must be taken to avoid compression deflection of the flashing from over-torquing the lag bolt. Special roofing shoes or protective mats can be used to minimize the risk of bruising on warm or cold days.
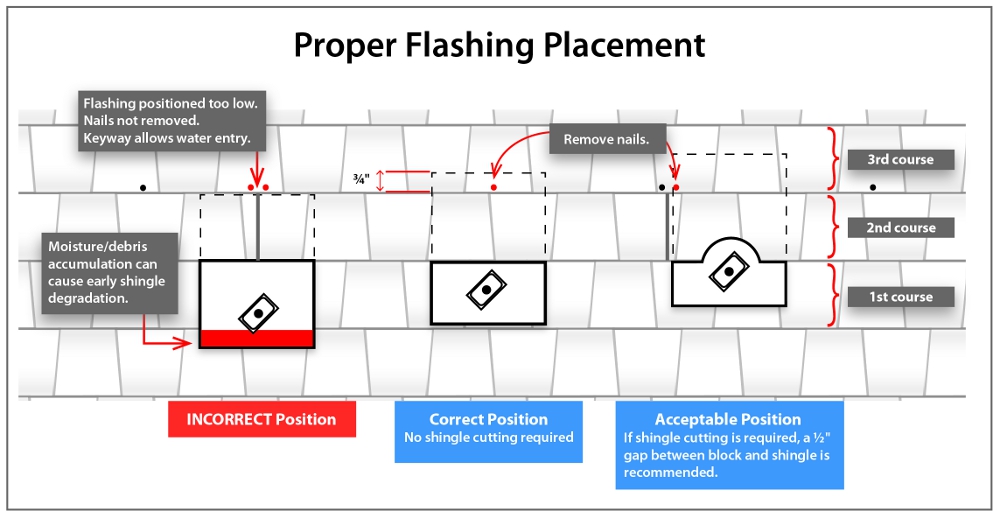
This diagram shows the acceptable position for flashed roof-mounts. Most mounts will require at least one nail be removed.
6. Flashing width
Asphalt shingle flashings should be at least 9 in. wide to comply with roofing industry best practices. This assures at least 4 in. of coverage from the edge of the hole to the edge of the flashing. More width provides additional protection from wind-driven rain making 12-in. wide flashing very popular. Tile flashings typically are 18 in. or wider to meet Tile Roofing Institute (TRI) guidelines.

This flashed Quick Hook uses a three-course sealing system that is approved by the TRI guidelines. Mastic applied to fiber mesh provides long-term waterproofing of the top and sides of the base flashing to the rolled roof underlayment.
7. Flashing material
Flashings should be made from an NRCA-compliant metal (aluminum, stainless steel, lead or galvanized steel). The TRI requires curved tile flashing be made from malleable metal. SMACNA (Sheet Metal and Air Conditioning Contractors’ National Association) considers galvanized steel to be suitable only for 15 years of service life, and any breach of the zinc coating will cause corrosion and rust staining. For this reason, galvanized is inadvisable in coastal and industrial environments as well as any installation with more than 15 years of expected life.
8. Seal design matters
Select flashed mounts with a robust seal. Seals that are elevated above the waterline will provide longer life than seals at the waterline, especially in freezing climates. Please note that sealant is a helpful addition to a properly installed flashing; however, when used alone, sealant is not an alternative to metal flashing required by building codes.

The Tile Roofing Institute guidelines require a base flashing be used at the underlayment level. The TRI guidelines are code-required for most tile roofs. Underlayment bibbing is one of two accepted methods for waterproofing the base flashing.
9. Install base flashing on all tile roof mounts
This frequently disregarded code requirement will cause premature leaks on tile roof installations within five to 10 years. All major tile manufacturers abide by TRI’s guidelines which mandate flashing at both tile and underlayment levels. All tile standoffs need a “base flashing” that is bibbed or three-coursed to the underlayment. Then the “tile-level flashing” is installed either on top or just below the tile. Tile hooks also require base flashing, but tile-level flashing is not required since the tile is not penetrated.
10. The benefits of re-roofing under the array before solar installation
Most arrays are installed on roofs with less than 10 years of remaining life. It is strongly advised that the installer replace the shingles or tile underlayment under the field of the array before installing solar. Replacing the roof under an average-sized array prior to PV installation will add $1,000 to $1,500 to the initial installation cost. Homeowners who ignore this advice will pay an additional $3,000 to $5,000 to remove and reinstall an average-sized system for the inevitable roof replacement. Simply stated, unless your roof is relatively new, re-roofing prior to PV installation is the most effective strategy to getting the best financial performance from a solar investment.


If you use the hole drilling method to locate rafter, it is imperative to start within 1/2″ from rafter. Locate rafter via rubber mallet tapping, rafter mapping, or eave position and drill 1/8″ hole through sheathing approx 1/2″ away from what you assume is the edge of rafter. It is very obvious if you hit a rafter or not. Drill your next hole about 1/3″ away. If you still have not hit the rafter, drill a third hole another 1/3″ closer. You should hit the rafter in the second or 3rd drill hole.
Dont worry about the extra holes through the sheathing as our classic comp mount and QBase Comp Mount flashings will still provide more than the required 4″ of side lap even if your first finder hole through the sheathing is 1″ away from the rafter.
It is desirable to fill the finder holes with a quality sealant that is compatible with the shingles. This can be done from both the roof and inside the attic for maximum sealant adhesion, but rooftop application is probably fine for most roofs. Low slope (2:12 to 4:12 pitch) roofs might benefit from inside the attic sealant application.